
Written by Giovanni
Edited on
12 July 2024
·
15:23
How do you solve microphone problems with your SteelSeries headset?
Doesn't your PC detect your SteelSeries gaming headset? You can solve that by adjusting the privacy settings for the microphone in Windows. We'll explain how to solve problems with your SteelSeries headset microphone here.
Detect your SteelSeries headset in 3 steps
Adjust the Windows settings for your microphone correctly. Follow the 3 steps below and solve detection problems with your microphone.
Step 1. Adjust the privacy settings
Step 2. Adjust the Windows settings correctly
Step 3. Set the correct audio format.

Step 1: adjust the privacy settings
Start with turning on your SteelSeries headset, and wait for it to connect to your PC. On the desktop, you can click the magnifying glass in the bottom left. Type 'microphone privacy settings' in the bar, and click the option with the same name. Click the slider, so it's set to 'On'.
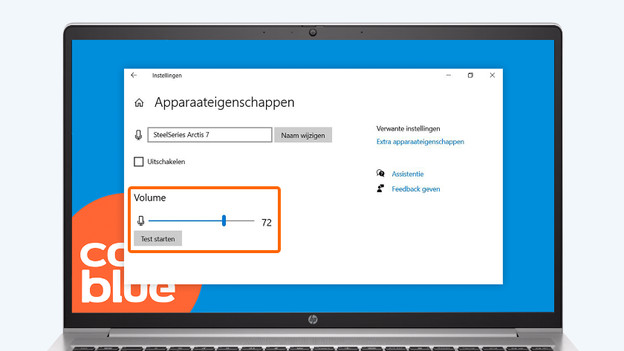
Step 2: adjust the Windows settings properly
Go to the desktop of your PC and click the magnifying glass in the bottom left. Type 'Sound settings' and click the option that appears with the same name. Below 'Input', choose the right input device. That's the SteelSeries headset. Click 'Device properties'. Slide the bar below 'Volume' all the way to the right, until it indicates 100%.
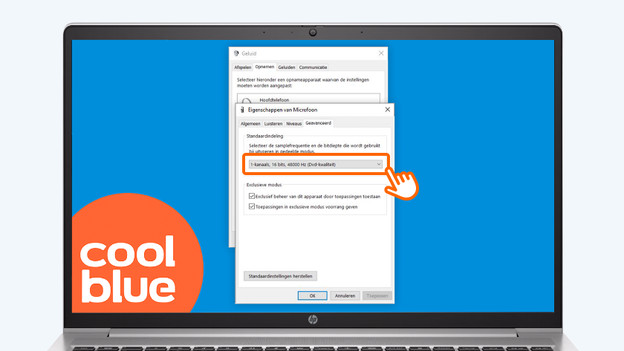
Step 3: set the correct sound format
In this 'Device properties' window, click 'Additional device properties'. Go to the 'Advanced' tab. Below 'Default format', select the option with 48,000Hz. Your SteelSeries headset is now ready for use, and your microphone works correctly.
